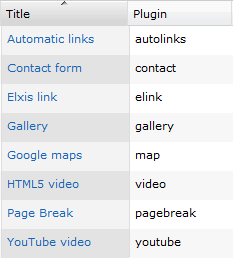
A presentation of preinstalled content plugins
Elxis is distributed with a number of preinstalled Content Plugins. In this article we will present their features and how to use Content Plugins in articles. We remind you that in order to configure each plugin you must visit the respective Tab: Extensions → Content Plugins → [Click on a Content Plugin] → [tab] Parameters. To import them in an article, you must click the Elxis symbol from the WYSIWYG editor. So let’s see in detail the preinstalled Content Plugins.
1. Automatic links
Generic syntax:
{autolinks}comma,separated,keywords{/autolinks}
Plugin will convert given keywords, or article's META keywords, into links pointing to the tags search page. This way visitors can easily find similar articles. The plugin will boost your site' SEO value as it improves cross-site linking. To enable autolinks in an article just insert the plugin code {autolinks}{/autolinks} into the article's text area. Insert the plugin code only once in any editor instance. If you don't provide keywords then the article's META keywords will be used as keywords. If you want you can set which keywords to use by separating them with commas like this: {autolinks} italy,spain,greece,russia{/autolinks}.
Tip: Pick keywords that exists as META keywords in other articles!
Automatic links plugin does not have parameters.

2. Contact form
Generic syntax:
{contact}recipient_email_address{/contact}
The plugin will create a contact form in an article. The recipient's email is required. The email address you have registered in the General settings of your Elxis site is defined as the sender's email: Site → Settings → [tab] Sender e-mail.
In the parameters of the Contact form plugin, you can add or remove elements from the contact form. E.g. telephone, address, city, country exc. You can specify what form elements (fields) are required and also create new ones, manually.
3. Elxis link
Generic Syntax:
<a href="#elink:elxis_uri_here" >text </a >
Add links in the editor area as anchors pointing to #elink: and followed by the Elxis URI you want to link to. All links point to index.php (no popups) and are multi-lingual (except if mentioned differently).
The generic Elxis URI syntax is: language:component:page where language can be omitted for auto-language linking.
At the import of the Elxis plugin you can create links to existing Content Categories or installed Components.
We recommend using the Elxis link plugin for all the links posted in an article via the WYSIWYG editor.
Examples
Link to a content category: <a href="#elink:content:sports/" >Sport news </a >
Link to an article: <a href="#elink:content:sports/football.html" >Football news </a >
Link to an article (autonomous page): <a href="#elink:content:terms.html" >Terms and conditions </a >
Link to users central (component user): <a href="#elink:user:/" >Users central </a >
Link to users central, forced to the French version of the site: <a href="#elink:fr:user:/" >Users central (french) </a >
Link to images search engine (component search): <a href="#elink:search:images.html" >Search for images </a >
Link to site frontpage: <a href="#elink:content:/" >Frontpage </a >
Elxis link plugin does not have parameters.
4. Gallery
Generic Syntax:
{gallery}relative/path/to/images/folder/{/gallery}
Concerning uploading images: 1. Not allowed to upload images in the root folder, 2. you can not create a 3rd level subfolder and 3. folders and images names must contain lowercase Latin alphanumeric characters, without spaces and special symbols.

The Gallery plugin allows you to easily display image galleries inside articles. There are several settings on the Gallery plugin's edit page*. It is also possible to display multiple image galleries on a single article. Images should be located in a sub-folder of the media/images/ path.
With the help of the Gallery plugin import wizard, you can select a folder or upload an image to any folder you wish.
In case you use the Multisites function, then for the folder media/images/ a relative folder is created eg: siteX for each site. The parent site can handle all image files.
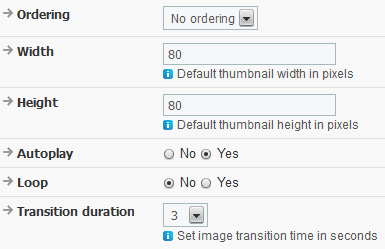
In the parameters of the Gallery Plugin, a range of options are given to us, as shown in image on the right
These options are:
1. Image ordering (no ordering, by name, by date), 2. thumbnail width, 3. thumbnail height, 4. autoplay, 5. Loop (repeat after executed once) and 6. Image transition time in seconds.
5. Google Maps
Generic syntax:
{map info="optional info" width="opt width" height="opt height"}latitude, longitude{/map}
Map plugin allows you to display Google maps inside Elxis articles. You can display any location in the world and info for each location. The map appearance is fully customizable (marker style, map size, map type can be normal, satellite and hybrid, zoom, controls, map scale etc). You can change these parameters on Map plugin's edit page. To get a location coordinates, go to Google maps find the spot you are interested in and central the map on this spot. After, click on the link icon Google provides you to copy the URL of the page. On the short URL there is an attribute named ll. These are the coordinates (Latitude, Longitude) we are interested in. Copy this in the plugin's Coordinates text box.

You can use the Google Maps API version 3 for free. However if you make massive usage it is recommended to take a look at the usage limits of this API. You must load the maps API using an API key in order to purchase additional quota.
These parameters exist in the Google Maps plugin: Google key statement, map dimensions, map type selection, settings for focus, navigation and display tools (eg Scale).
6. HTML 5 Video
Generic syntax:
{video width="480" height="270"}relative/path/to/video/sample.webm{/video}
An HTML5 video can consist of several video files of different extensions and subtitles in different languages. Poster images are also supported.
The video files that belong to the same video should have the same name. Example: sample.ogv, sample.mp4, sample.webm
Poster image (optional) should also have the same name as the video and an jpg, jpeg or png extension. Example: sample.jpg
You can optionally upload vtt or srt subtitles. The subtitles naming format is: {video_name}_{language}.vtt/srt Examples: sample_en.vtt, sample_el.vtt, sample_it.srt
Web servers have an upload limit (usually 2mb to 8mb), so if you try to upload larger files from here the action will fail. Upload large files via FTP. After uploading your files, pick just one of the videos files you uploaded to generate the plugin code. The Video plugin will automatically load all related files during playback. Don't forget to also set the plugin's general configuration parameters.
If your server does not have MIME support for HTML5 videos then the videos wont play. In this case add in your site's htaccess file the following: AddType video/ogg .ogm
AddType video/ogg .ogv
AddType video/ogg .ogg
AddType video/webm .webm
AddType audio/webm .weba
AddType video/mp4 .mp4
AddType video/x-m4v .m4v
Uploading videos, images and subtitles
Upload video files (ogg, ogv, mp4, webm), poster images (jpg, jpeg, png) or subtitle files (vtt). File names should contain only lowercase alphanumeric latin caracters, no spaces and the symbols _ and -. You can upload multiple files at once.
In the parameters of the HTML5 video plugin you can edit options such as: the video’s dimensions, autoplay, repeat, subtitle display (predefined off) as well as the subject of the player.
7. Page Break
Generic syntax:
{pagebreak}{/pagebreak}
With the Page Break plugin you can split an article in multiple pages. Page Break will also display a table of contents (TOC) in the bottom of the article for navigation through the pages.
Page break plugin does not have parameters.
8. Youtube video
Generic syntax:
{youtube width="425" height="350"}YouTube video ID{/youtube}
Each Video on Youtube have a specific URL structure. For example: An elxis video regarding the Elxis Download Center is placed on the url : http://www.youtube.com/watch?v=EZHR569uoew. The video id for this URL is: EZHR569uoew Youtube video plugin does not have parameters.
